Run Your Harness Outside the Sandbox: Why and How
Why the agent harness shouldn't run inside the sandbox, and how to run it in your own backend instead.
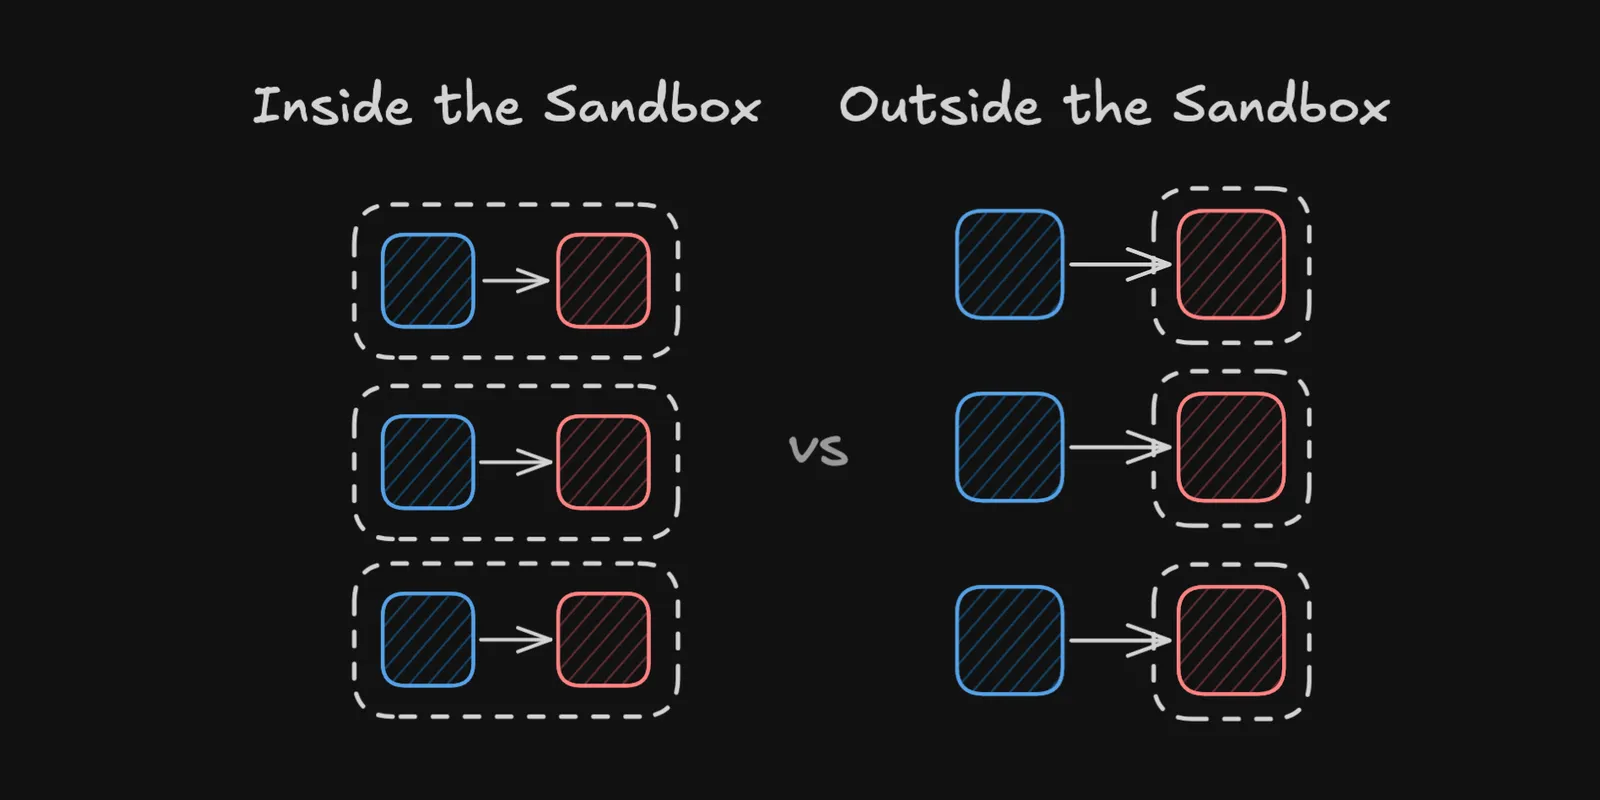
There’s been a running debate since the beginning of 2026 about where you run agents: inside the sandbox, or outside of it. There have been a lot of implementations of both, but the industry is moving toward running agents outside of sandboxes for mature projects.
Within the last few months, OpenAI, Anthropic, Vercel, Cloudflare, and Amp all shipped platforms that run the agent loop outside the sandbox.
Running Agents Inside Sandboxes: Easy to Set Up, Hard to Operate
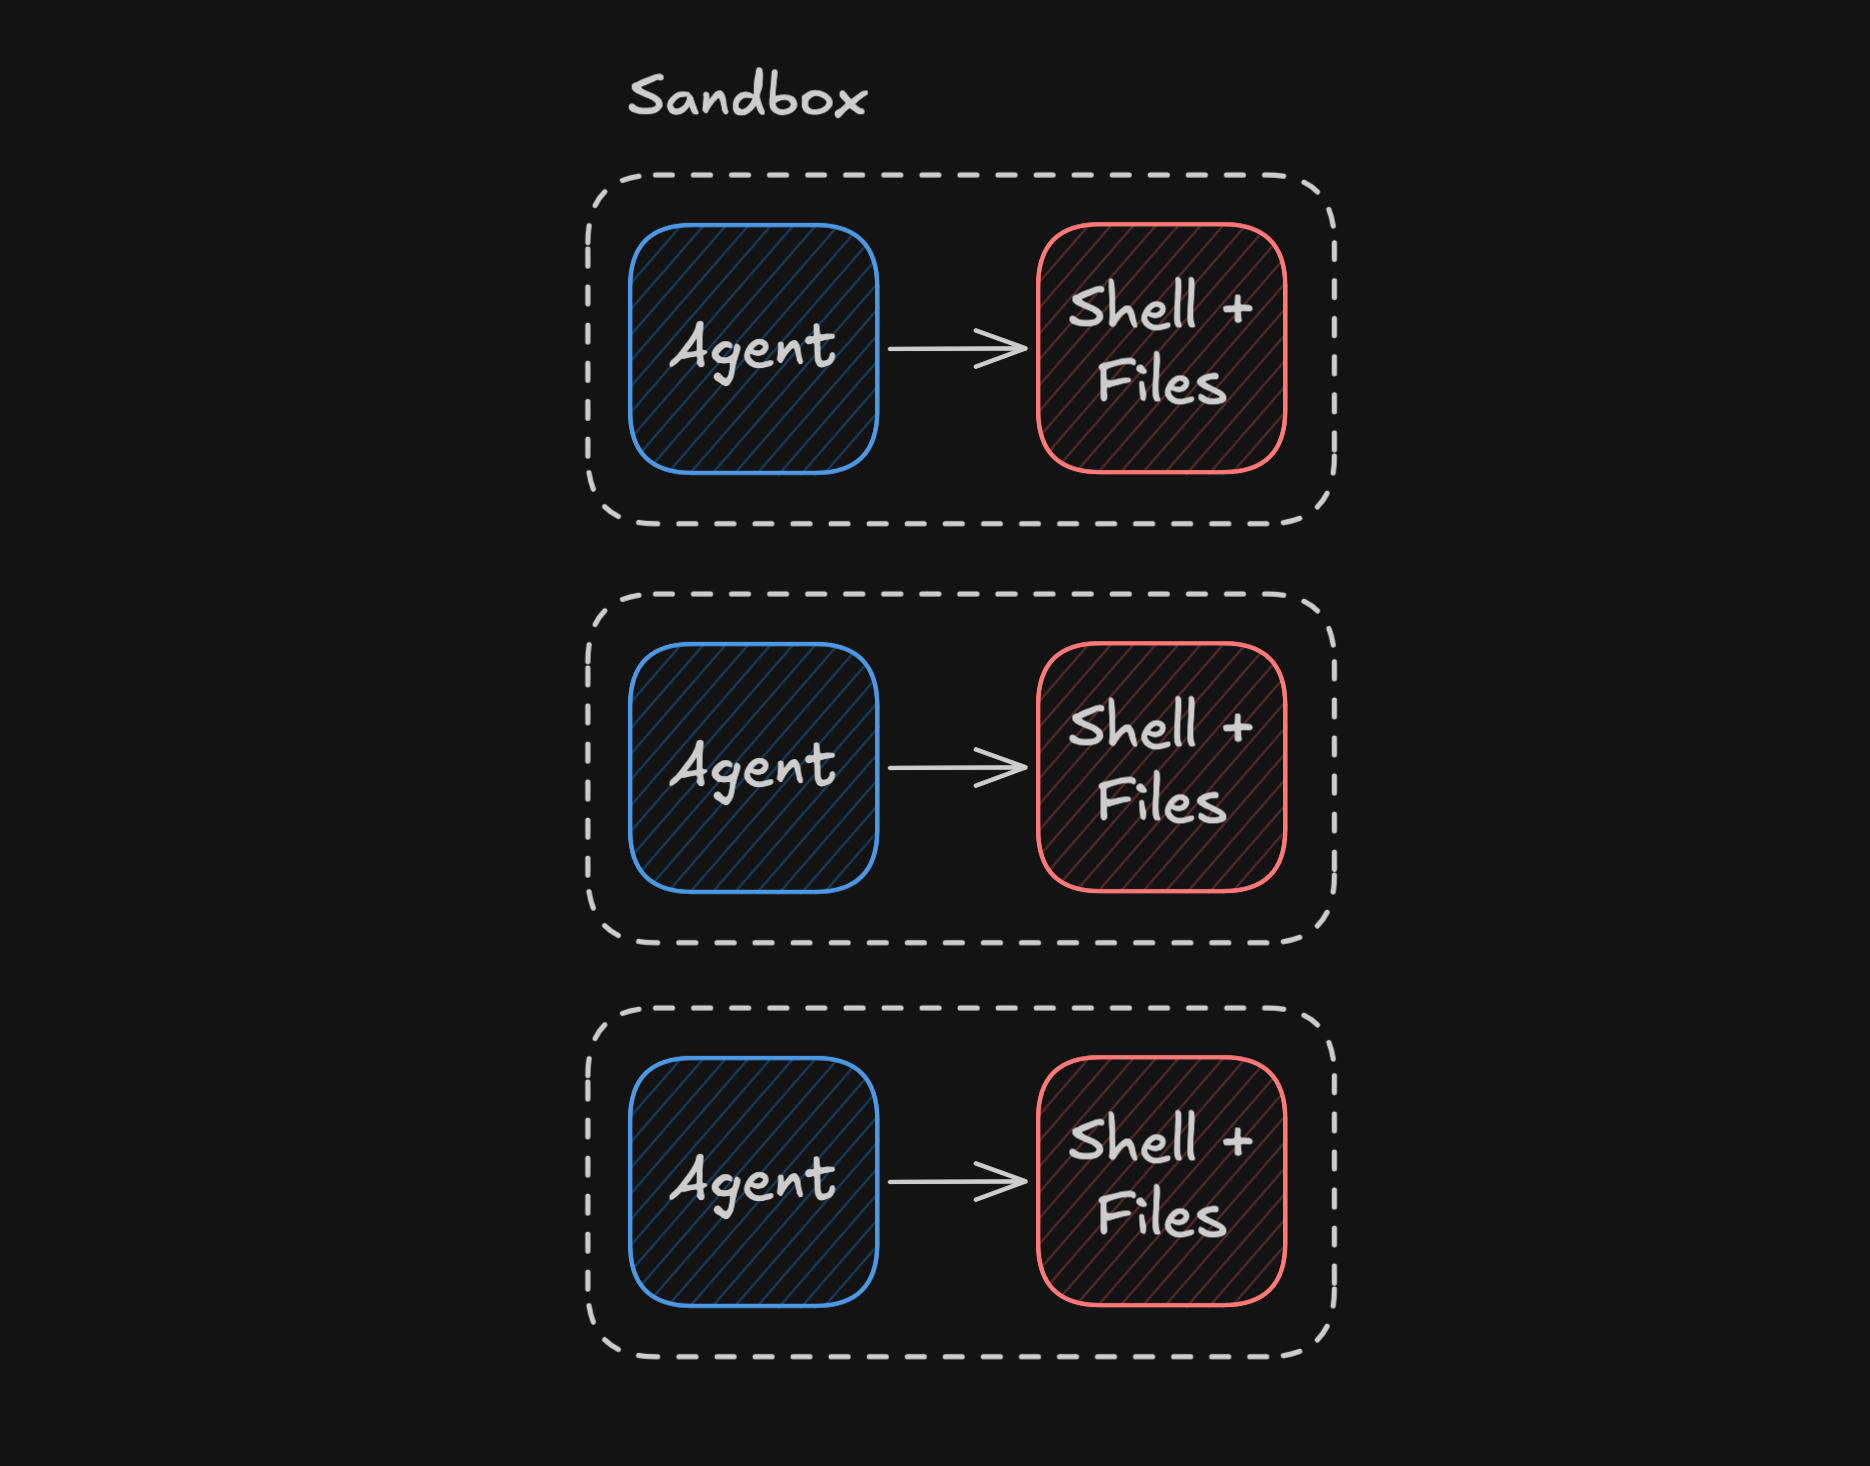
A lot of companies start by running the agent inside the sandbox because, frankly, it’s simple. Setting it up looks something like this:
- The user creates an agent
- Your API creates a sandbox
- The user sends a prompt
- You call the
claudeCLI inside of the sandbox with the user’s prompt, using an exec command API call - You get the response
- You send the response back to the user
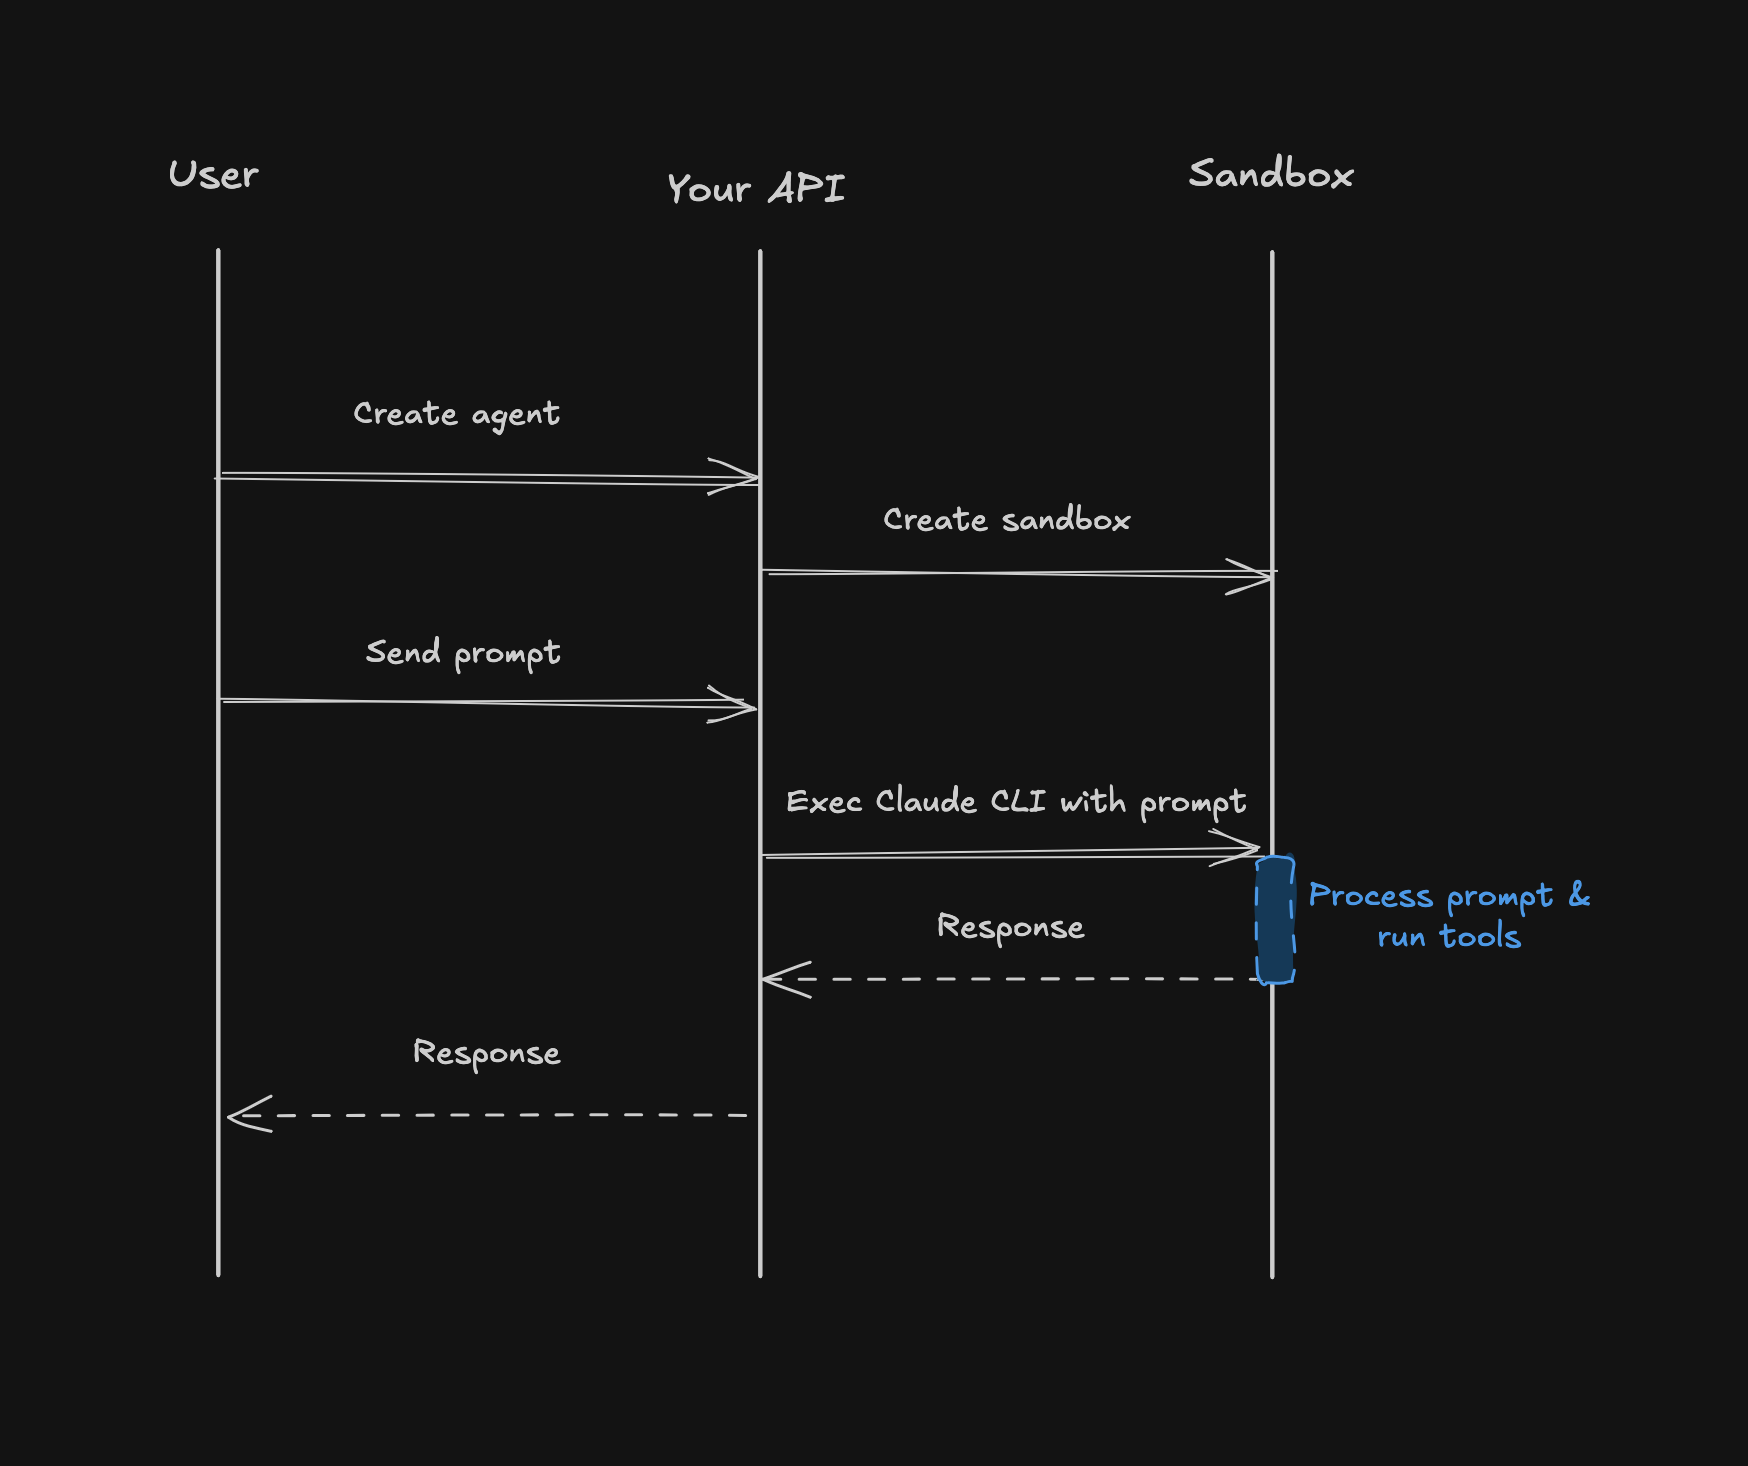
But when companies run with this architecture, they start fighting an uphill battle against the inherently chaotic nature of what runs inside a sandbox.
Why Not Run Agents in Sandboxes
Sandboxes are built for running untrusted code, not for hosting the agent itself. Running the agent inside falls apart for three reasons:
Reason 1: The Blast Radius
Sandboxes are a place for containing the chaos that agents create. That’s by design, there’s no structure to what agents can do inside of a sandbox, so sandboxes break for many, many reasons. A build command OOMs the sandbox, a runaway script pegs the CPU, a botched tool install breaks $PATH, or the filesystem just ends up corrupted.
When the sandbox breaks, it takes these down with it:
- The agent loop, retries, and durability: The durability mechanism that’s supposed to recover from failures dies when the sandbox dies. Retries need to live in your backend so you can gracefully handle failures of the sandbox itself.
- Session history: The session history gets corrupted or wiped along with everything else when stored inside the sandbox. Keep it outside, in a real database.
- Observability of failures: If the sandbox dies, it will not be able to report its own failure to observability. Ship detected failures from within your own backend.
Reason 2: The Trust Boundary
Sandboxes are meant to have a trust-nothing architecture, because agents are prone to prompt injection and leaking sensitive information. If something is accessible in the sandbox, it’s safe to assume that data or API will be abused and leaked.
You can do none of these safely in a sandbox:
- LLM credentials and routing: A token inside the sandbox is a token the agent can leak or abuse. Keep it outside. (Some routers have per-tenant scoped tokens that help mitigate this problem.)
- Permissions and approvals: Coding agents are trained to work around barriers, so permissions enforced inside a sandbox are permissions the agent can probably work around. Enforce them outside in your trusted backend.
- Audit logs: An audit log written from inside the sandbox is one the agent can manipulate or corrupt. Write it from outside.
- Multiplayer security: Access to the sandbox is access to everything, so there’s no way to give collaborators per-user permissions inside it. Enforce per-user permissions within your backend.
- Trusted tools: Tools that talk to private databases or internal APIs need credentials the sandbox can’t be trusted with. Provide them as tools in the harness, no custom authentication proxies required.
- Agent-to-agent communication: Sandbox-to-sandbox communication means every sandbox must hold addresses and credentials for its siblings, which is complicated, error prone, and insecure. Route agent-agent communication in your backend instead where you don’t need complex authentication and routing mechanisms.
Reason 3: The Sandbox Isn’t Always Running
Sandboxes go to sleep when not in use, by design. But that breaks a lot of what makes agents powerful.
Here’s what stops working while the sandbox is asleep:
- Schedules (“loops”): A sleeping sandbox can’t wake itself to trigger something. Your harness outside the sandbox is responsible for waking it.
- Workflows (“graphs”): A durable multi-step workflow retries failures and may sleep for hours. Something has to exist outside the sandbox to resume it.
- Loading sessions quickly: Reading a session shouldn’t require waking a sandbox, because starting one can take a long time. Store the history in an external database and reads are instant.
- Indexing sessions: Searching across sessions means reading every transcript, and you can’t wake a fleet of sandboxes to build an index. With history outside, indexing is just a database job.
The Architecture: Expose the Sandbox as Tools
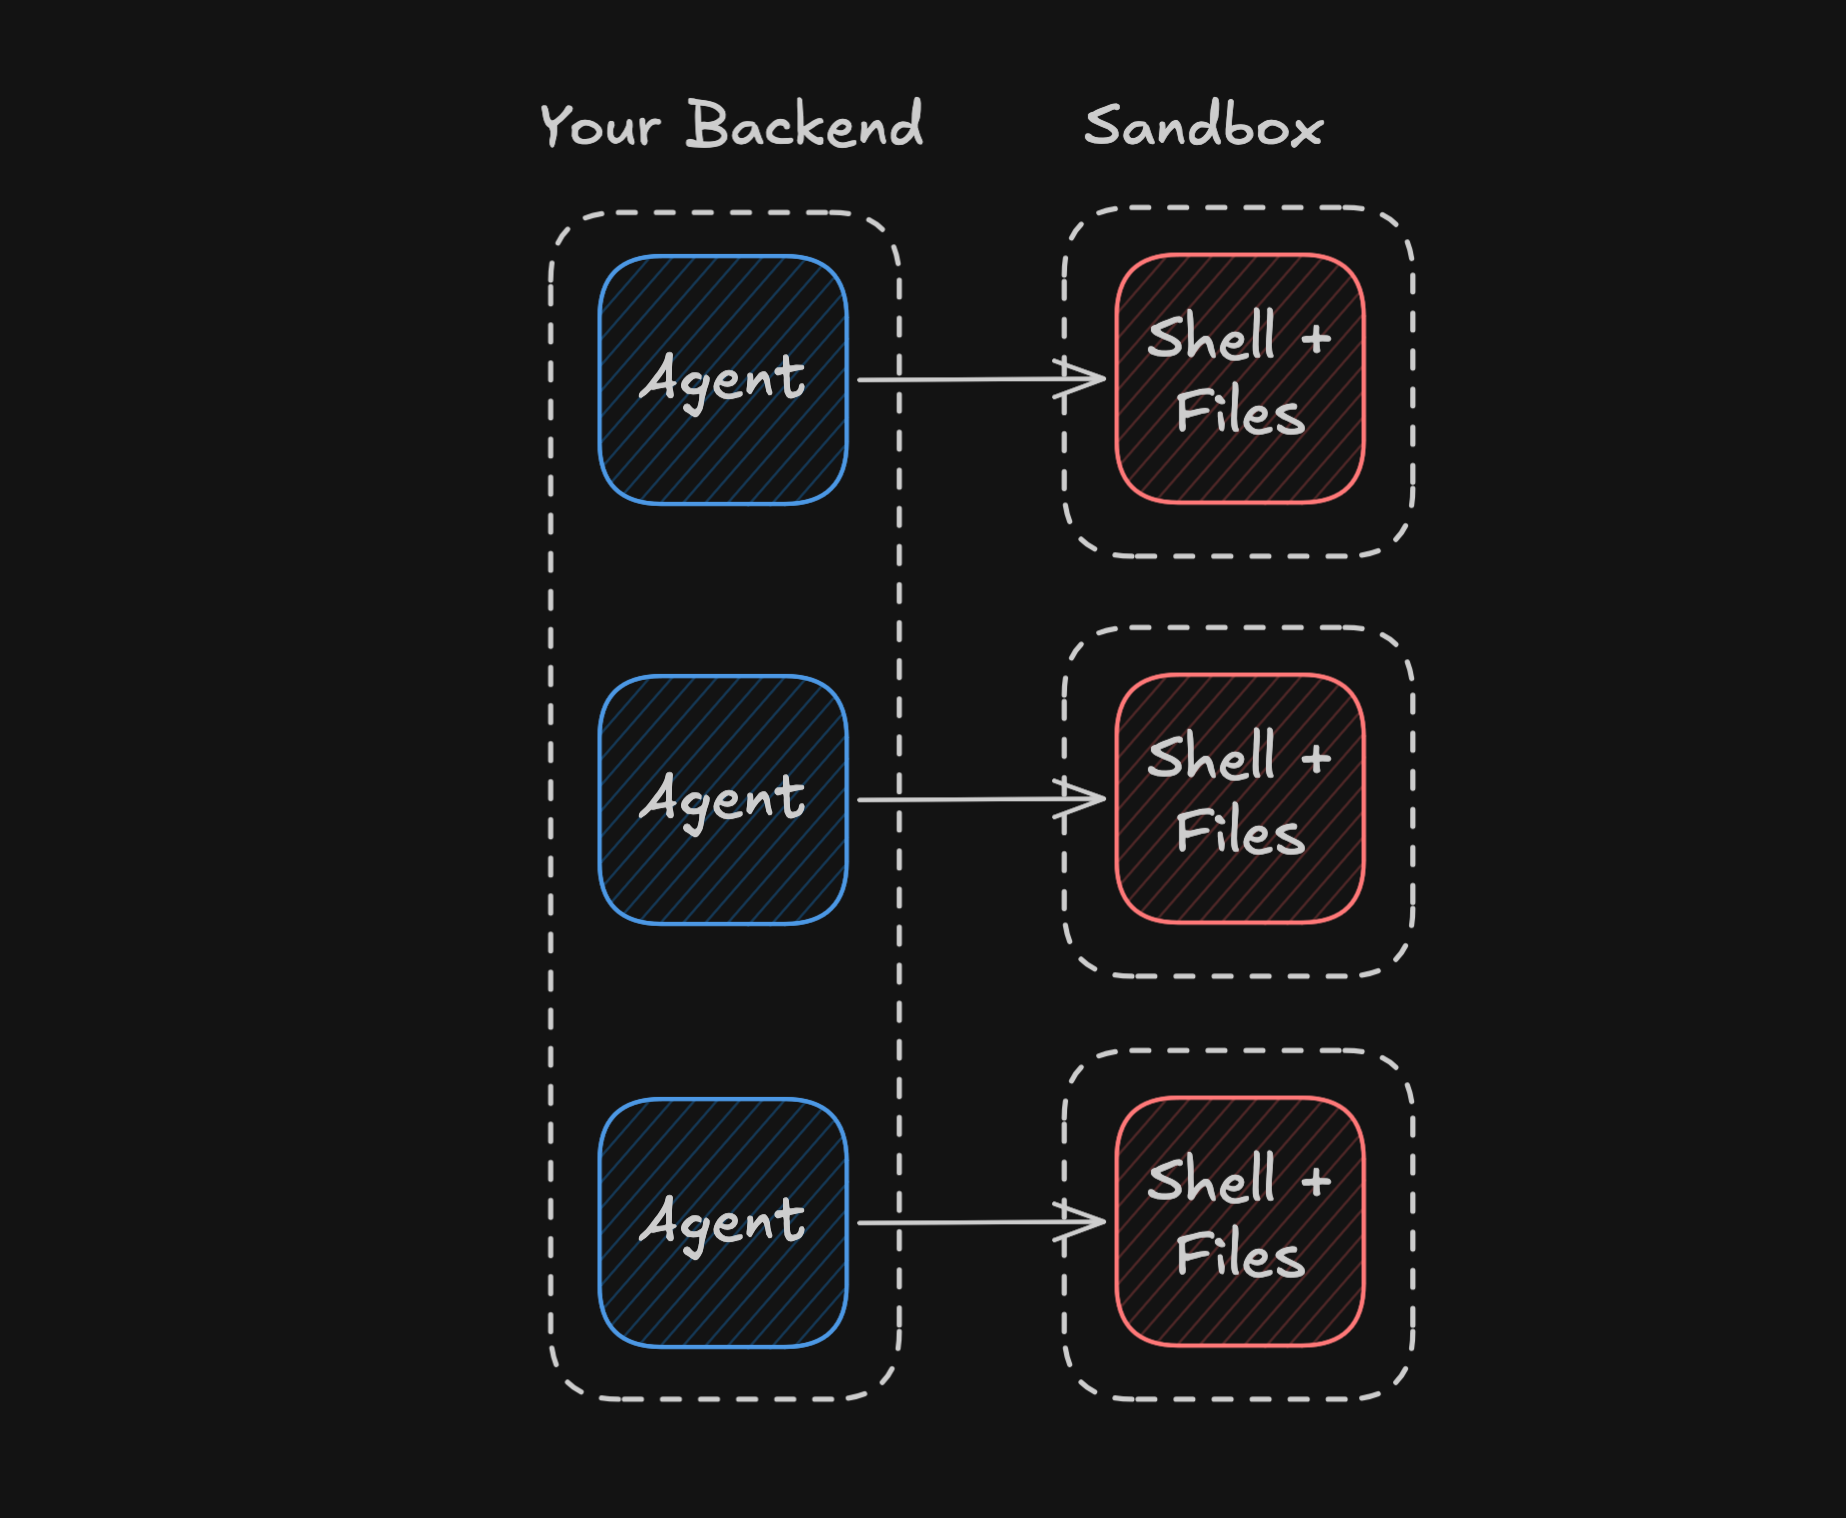
What does the correct architecture look like for agents and sandboxes? It requires moving the agent harness from running inside the sandbox to running in your own backend.
When the harness needs to execute a script, read or write a file, or do anything else in the sandbox, it goes through a tool that makes a remote call into the sandbox.
Nothing ever executes on the machine the harness runs on. Instead, everything executes as tool calls into the sandbox.
A Simple Example with the Vercel AI SDK
To introduce the concept, let’s start with the simplest possible version: a generateText loop with a message history and the sandbox exposed as tools. There’s no framework and no orchestration layer here. It’s three tools and a loop, about 90 lines of code.
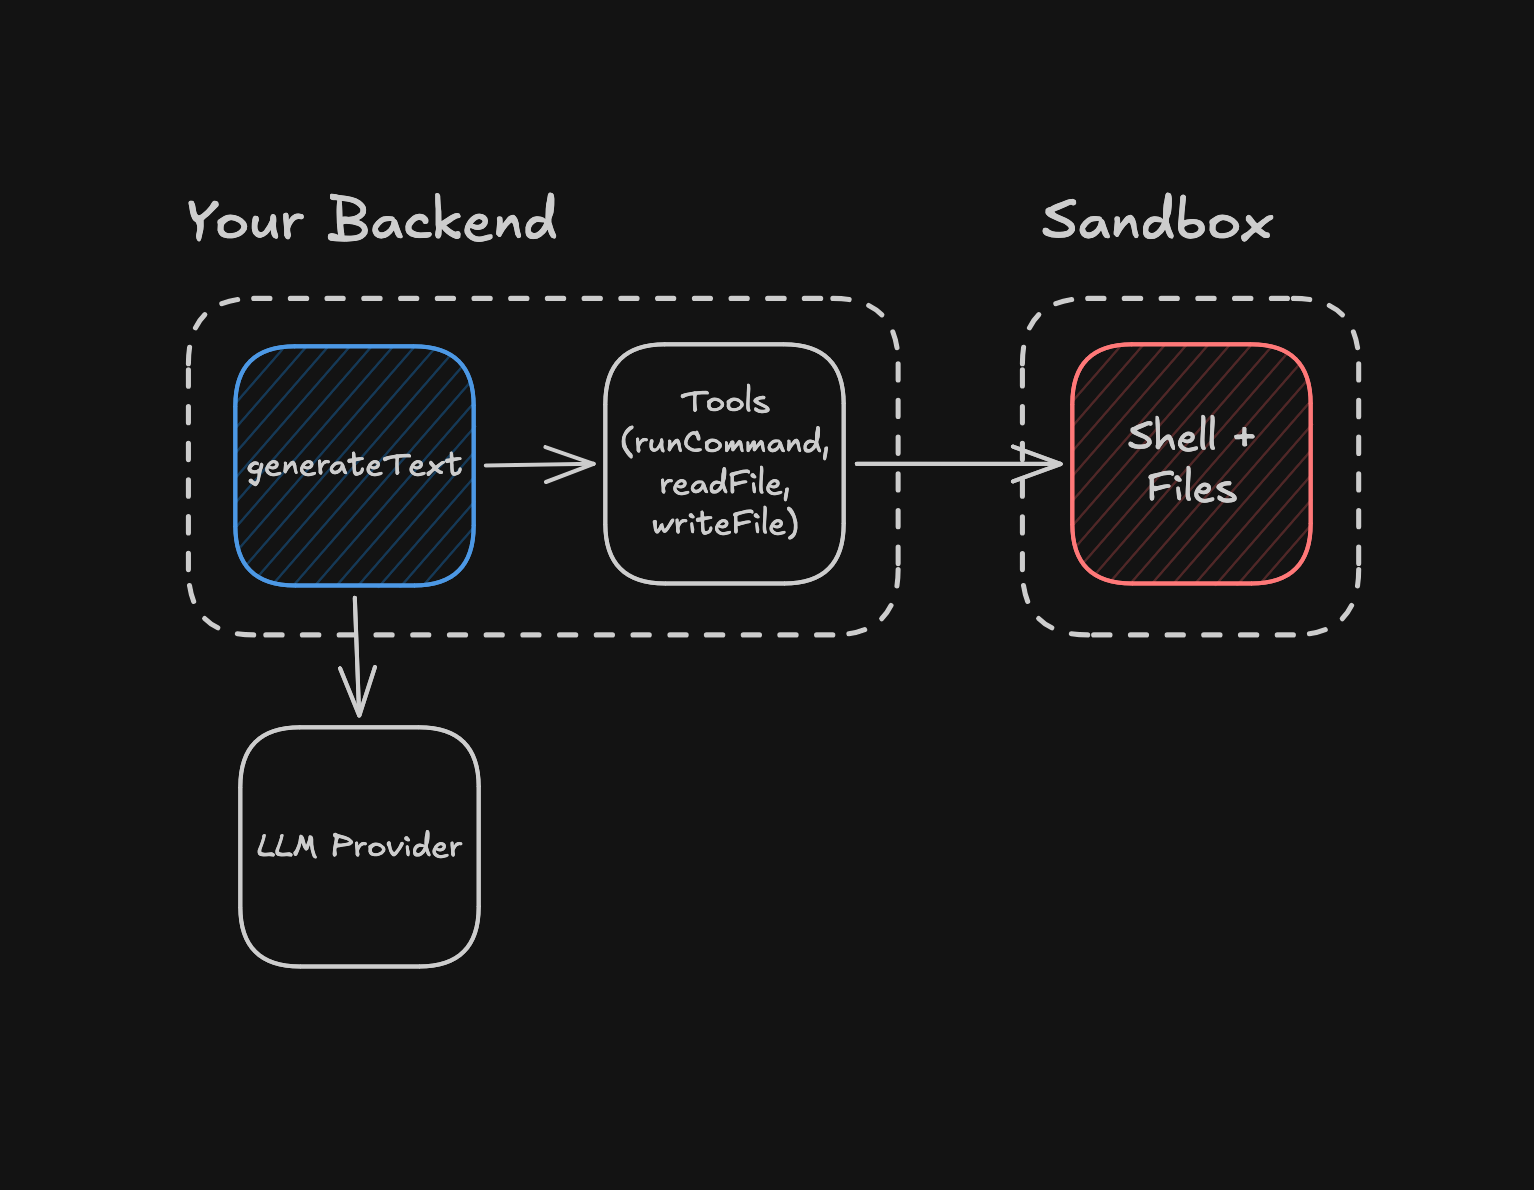
The code does three things.
1. Create the sandbox on the local Docker provider:
import { docker } from "@computesdk/docker";

// Boot a sandbox on the local Docker provider. Swap `docker` for any other
// provider (e2b, daytona, vercel, etc.).
const compute = docker({
	runtime: "node",
	image: { name: "node:22-slim", pullPolicy: "ifNotPresent" },
});
const sandbox = await compute.sandbox.create();
2. Define the tools that call into the sandbox:
import { tool } from "ai";
import { z } from "zod";

// The agent's tools run here in your own process. The sandbox only receives
// the commands and file operations that the tools send to it.
const tools = {
	runCommand: tool({
		description: "Run a shell command in the sandbox",
		inputSchema: z.object({
			command: z.string().describe("The shell command to run"),
		}),
		execute: async ({ command }) => {
			const result = await sandbox.runCommand(command);
			return {
				stdout: result.stdout,
				stderr: result.stderr,
				exitCode: result.exitCode,
			};
		},
	}),
	writeFile: tool({
		description: "Write a file in the sandbox",
		inputSchema: z.object({
			path: z.string().describe("Absolute path of the file"),
			content: z.string().describe("Full contents of the file"),
		}),
		execute: async ({ path, content }) => {
			await sandbox.filesystem.writeFile(path, content);
			return { ok: true };
		},
	}),
	readFile: tool({
		description: "Read a file from the sandbox",
		inputSchema: z.object({
			path: z.string().describe("Absolute path of the file"),
		}),
		execute: async ({ path }) => {
			return { content: await sandbox.filesystem.readFile(path) };
		},
	}),
};
3. Set up the agent loop, reading tasks from the terminal:
import * as readline from "node:readline/promises";
import { anthropic } from "@ai-sdk/anthropic";
import { generateText, type ModelMessage, stepCountIs } from "ai";

// Read tasks from the terminal and run the agent on each one
const terminal = readline.createInterface({
	input: process.stdin,
	output: process.stdout,
});

// The session history
const messages: ModelMessage[] = [];

while (true) {
	// Wait for the user to type a task
	const prompt = await terminal.question("agent> ");
	messages.push({ role: "user", content: prompt });

	// Run the agent loop until the task is complete
	const result = await generateText({
		model: anthropic("claude-sonnet-5"),
		system:
			"You are a coding agent working inside a fresh Linux sandbox with Node.js installed. " +
			"Use the tools to run commands and edit files to complete the user's task.",
		messages,
		tools,
		stopWhen: stepCountIs(20),
	});
	messages.push(...result.response.messages);

	console.log(result.text);
}
This gives you full control of the agent’s sessions, their permissions, observability, and everything else we discussed above.
The full runnable example is on GitHub.
Taking It to Production: The Problem of Stateless Servers
The above script works great on your local dev machine, but now we need to productionize it.
But there’s a problem. Most backends are stateless HTTP servers, and running an agent on top of them gets ugly fast:
- Race conditions: Two calls to the same agent land on different servers, and both run the loop and write history at once.
- Canceling prompts: Stopping a prompt mid-run means reaching into whichever request is running it, and stateless servers give you no way to do that.
- Multiplayer: Multiple users talking to the same agent need a shared, live place to connect, and a stateless endpoint can’t do that.
- Durability and fault tolerance: If the server dies mid-loop, the agent dies with it, and nothing resumes it.
Another alternative you might consider is a workflow engine for “durable agents.” But an agent’s main loop runs indefinitely, and workflow engines were never built for loops that never end:
- Replays get slow: Workflow engines rebuild state by replaying every step so far, and a loop that never ends means a replay that never stops growing. (Some workflow engines have hacks to cap the history, but they’re not built for this.)
- Hard to upgrade mid-run: Changing workflow code under a live run is notoriously difficult, and an agent that never exits means every deploy happens mid-run.
- No realtime or multiplayer: A workflow can’t hold a WebSocket or stream tokens to a client, so you end up building a separate layer for that.
Stateless servers and workflow engines fail for the same reason. An agent is a long-lived, stateful workload, and neither is built for that.
The Actor Model: The Stateful Architecture for Agents
The problem of stateful workloads is nothing new. Imagine running a tiny Node.js process forever for every agent: it restarts when it crashes, sleeps when it’s idle, and you can send requests to it.
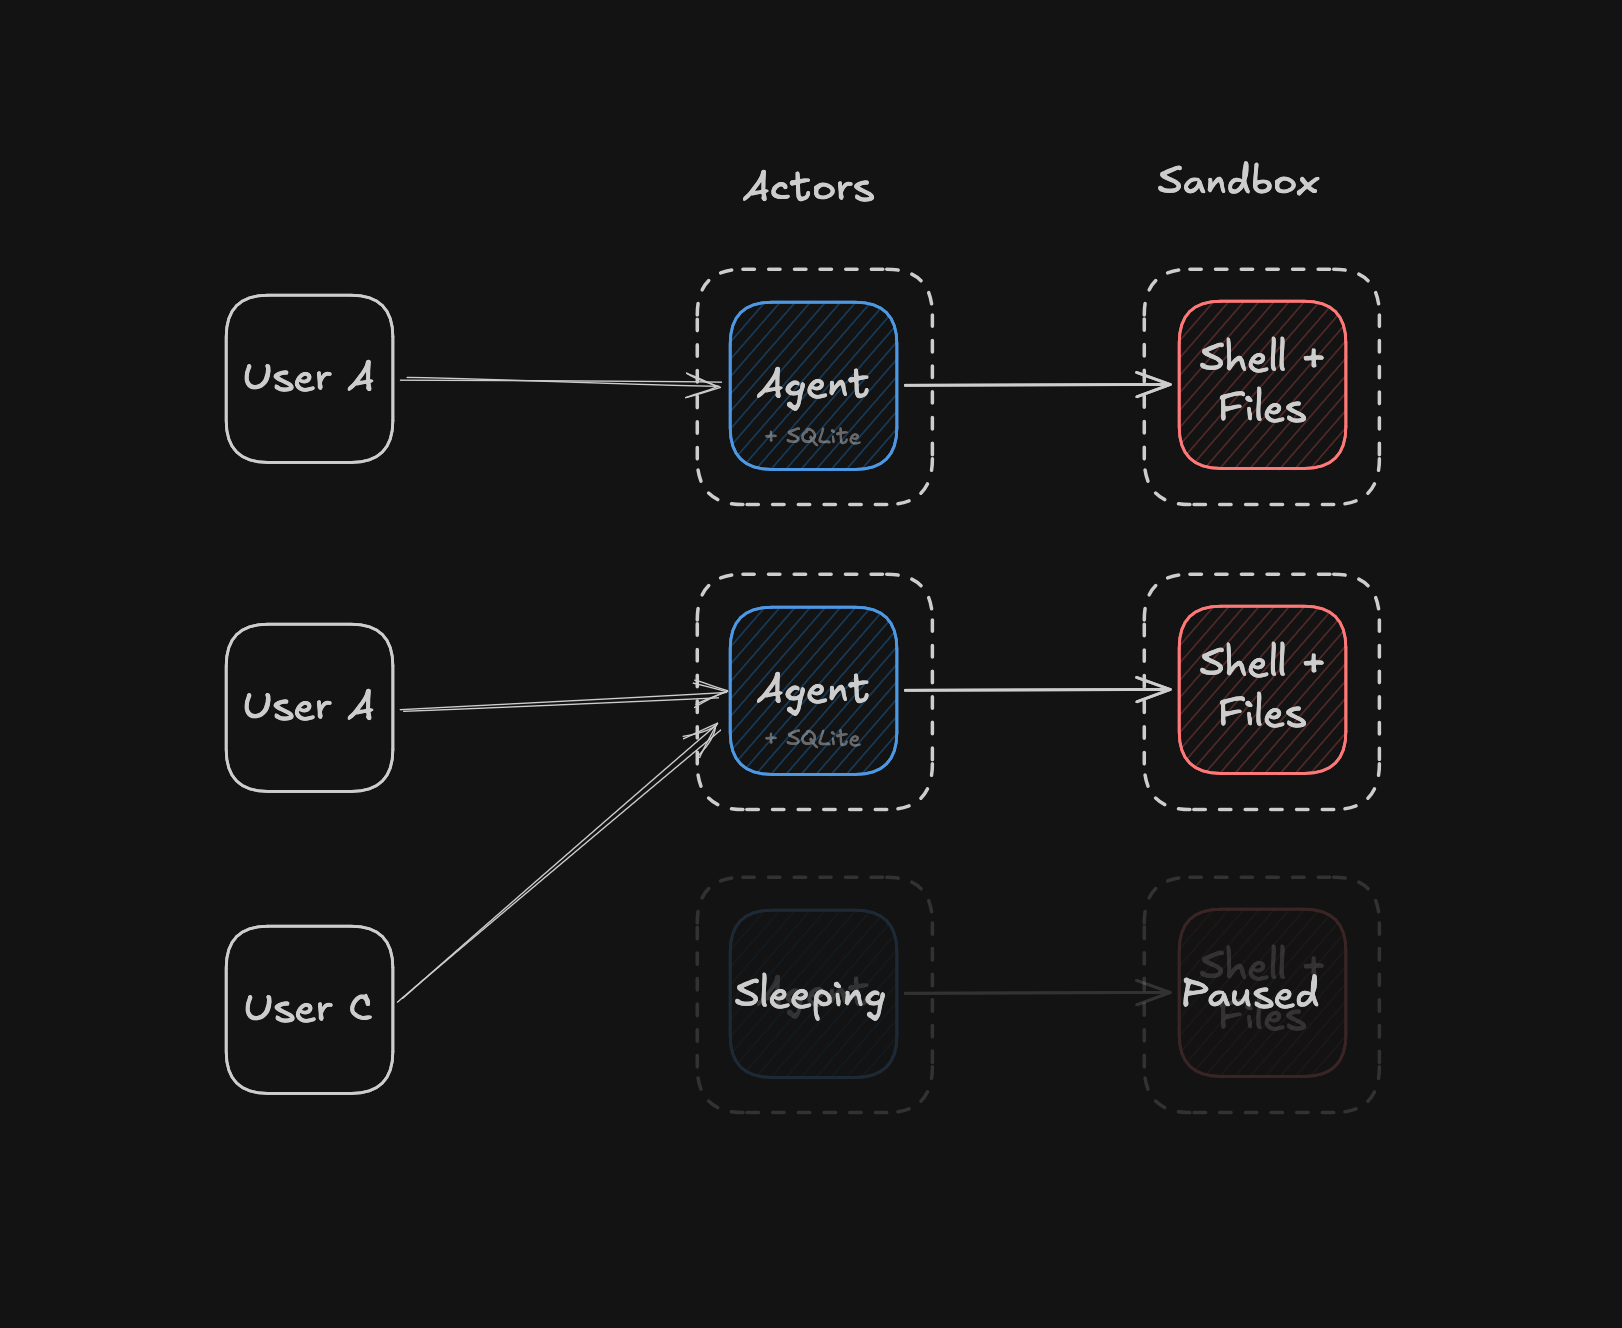
That’s the actor model: one actor per agent, each with its own sandbox. It’s the same architecture behind WhatsApp, Discord, and Halo’s multiplayer, and it’s the best way to run agents in production.
Looking back at the agent loop we built in the previous step, this fits the actor model well. Our agent needs to:
- Run for a long period of time: The agent loop survives anything. If the actor crashes or the sandbox enters a corrupt state, the actor restarts and picks up where it left off.
- Maintain state between runs: Each actor gets its own SQLite database, so session history lives right next to the loop.
- Sleep when idle: When the user goes quiet, the actor sleeps. Awake, it’s a couple megabytes of RAM. You pay web-request prices for a stateful process.
- Wake up when the user prompts it again, or on a schedule: Actors wake on requests, on a schedule or cron, and workflows are a subset of actors.
In addition, actors also provide:
- Multiplayer & realtime by default: Multiple clients can talk to the same actor, with WebSockets for realtime collaboration.
- Scales horizontally: One actor per agent, spread across as many machines as you need. Spinning up agents in parallel is the default, not a project.
Moving the Agent Loop into an Actor
Here’s a simple example of implementing this with actors. The code spans three files (client.ts, actors.ts, and server.ts), and the complete working version is about 180 lines of code:
- The user creates an agent, which creates an actor for it
- The actor creates a sandbox
- We set up the tools to talk to the sandbox
- The user sends a prompt
- We process the prompt, which then calls the tools
- We register the actor and start the server
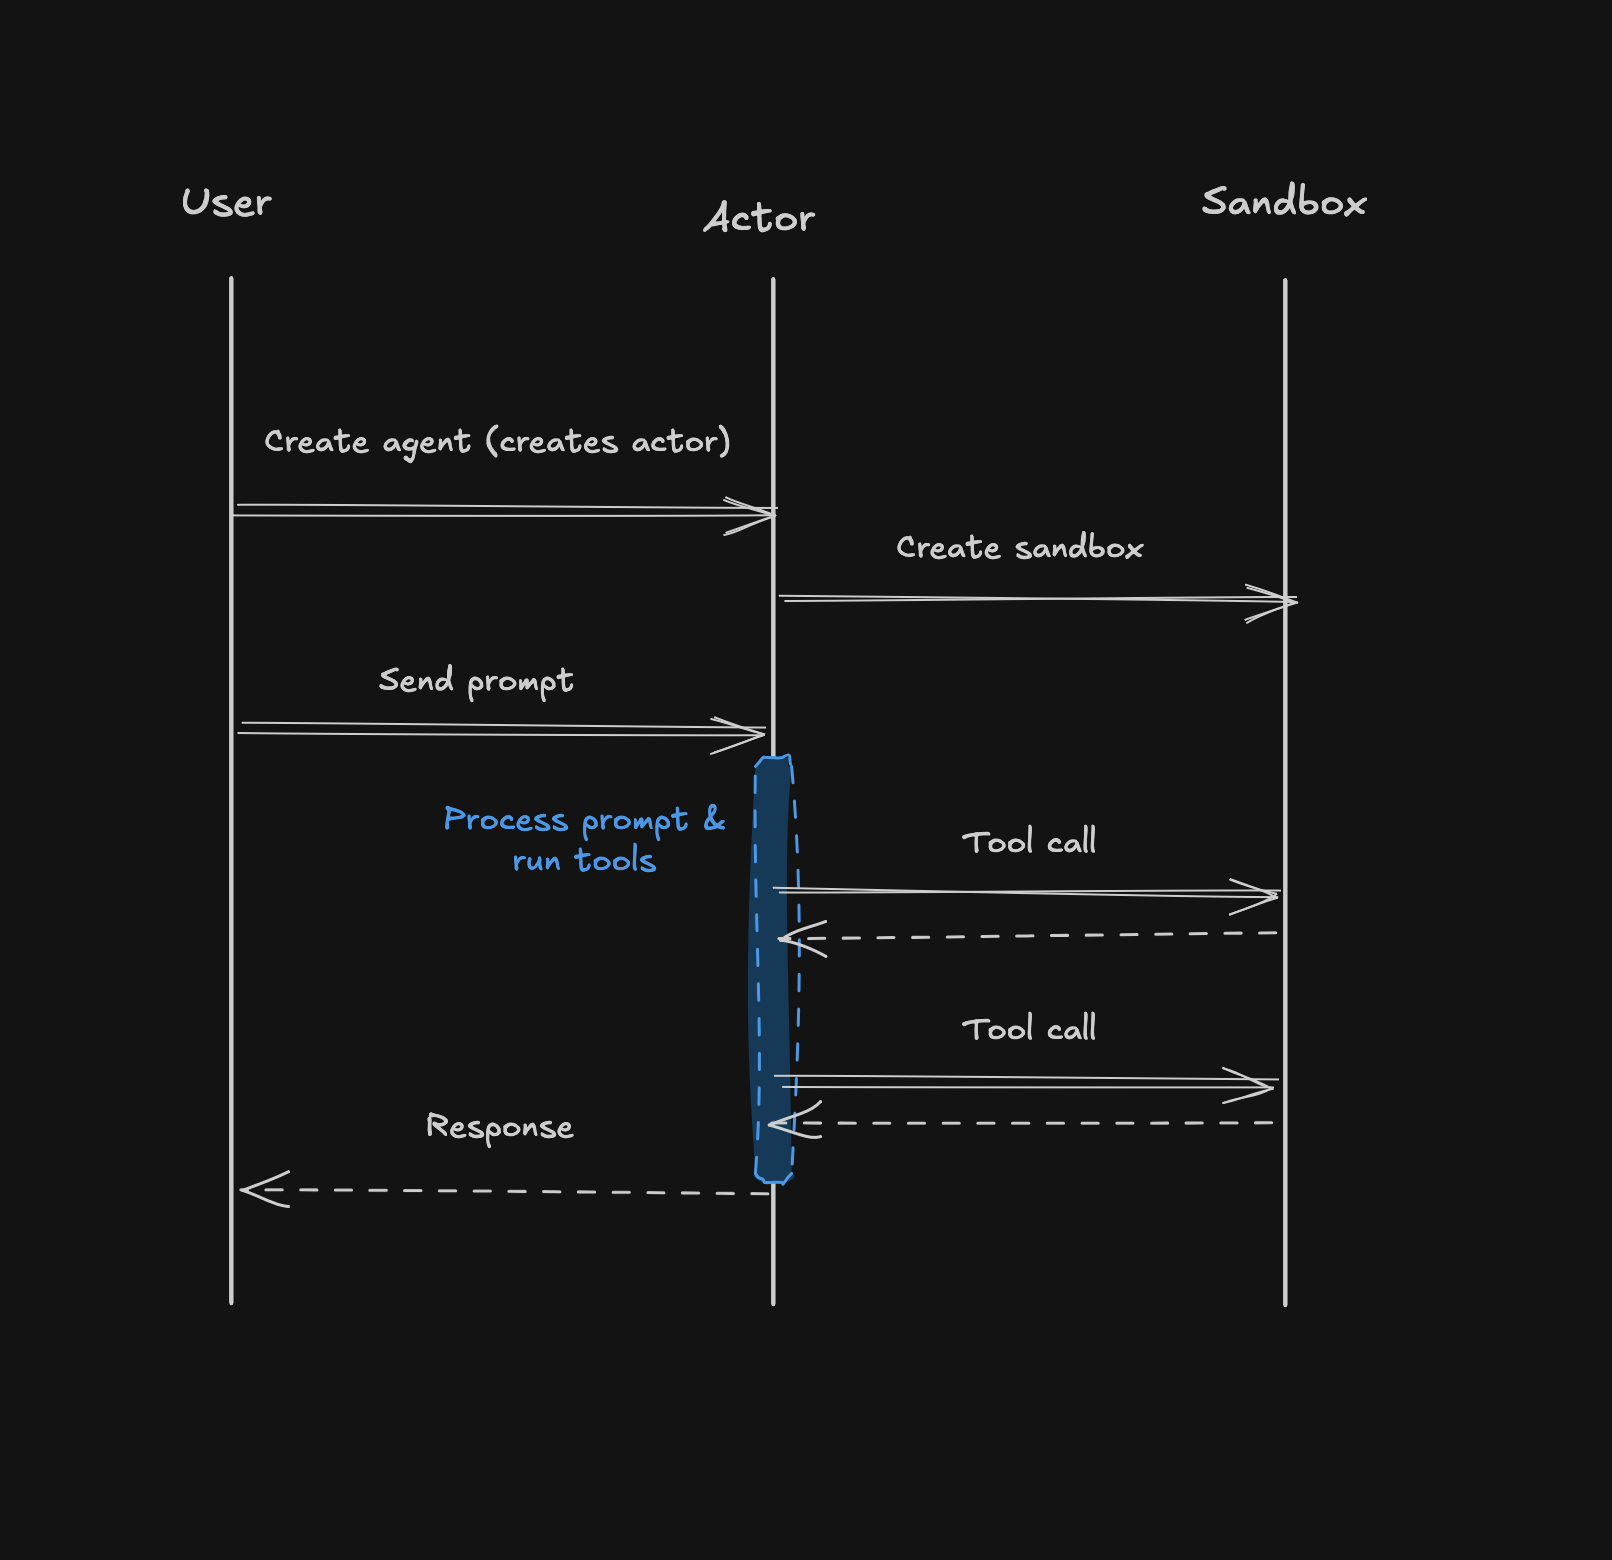
Step 1: The user creates an agent, which creates an actor. Each key is an independent agent with its own actor, sandbox, and history:
import { createClient } from "rivetkit/client";
import type { registry } from "./actors";

const client = createClient<typeof registry>();

// Each key is an independent agent with its own actor, sandbox, and history
const agent = client.codingAgent.getOrCreate(["demo"]);
Step 2: The actor creates a sandbox when it wakes, reattaching to the same sandbox across sleeps and restarts:
import { docker } from "@computesdk/docker";
import { actor } from "rivetkit";

// The same Docker provider setup as the simple example
const compute = docker({
	runtime: "node",
	image: { name: "node:22-slim", pullPolicy: "ifNotPresent" },
});

export const codingAgent = actor({
	// The sandbox id is persisted so the actor can reattach to the same
	// sandbox across sleeps and restarts
	state: { sandboxId: null as string | null },

	// Attach the sandbox when the actor wakes
	createVars: async (c) => {
		// Reattach to this session's sandbox, or boot a new one on first wake
		let sandbox = c.state.sandboxId
			? await compute.sandbox.getById(c.state.sandboxId)
			: null;
		if (!sandbox) {
			sandbox = await compute.sandbox.create();
			c.state.sandboxId = sandbox.sandboxId;
		}

		return { sandbox, tools: createTools(sandbox) };
	},

	// ...the rest of the actor comes together in step 5
});
Step 3: Set up the tools to talk to the sandbox:
import { tool } from "ai";
import { z } from "zod";

// The agent's tools run in the actor. The sandbox only receives the
// commands and file operations that the tools send to it.
function createTools(sandbox: Sandbox) {
	return {
		runCommand: tool({
			description: "Run a shell command in the sandbox",
			inputSchema: z.object({ command: z.string() }),
			execute: async ({ command }) => await sandbox.runCommand(command),
		}),
		// ...same writeFile and readFile tools as the simple example above
	};
}
Step 4: The user sends a prompt, queued on the actor:
import * as readline from "node:readline/promises";

// Read tasks from the terminal and run the agent on each one
const terminal = readline.createInterface({
	input: process.stdin,
	output: process.stdout,
});

while (true) {
	// Queue the task on the actor and wait for the agent to complete it
	const prompt = await terminal.question("agent> ");
	const result = await agent.send("prompt", { content: prompt }, { wait: true });
	if (!result.response) throw new Error(`Task ${result.status}`);
	console.log(result.response.text);
}
Step 5: Process the prompt off the durable queue, with the session history in the actor’s SQLite database:
import { anthropic } from "@ai-sdk/anthropic";
import { generateText, stepCountIs } from "ai";
import { actor, queue } from "rivetkit";
import { db } from "rivetkit/db";

export const codingAgent = actor({
	// ...state and createVars from step 2

	// Session history lives in the actor's own SQLite database
	db: db({
		onMigrate: async (db) => {
			await db.execute(
				"CREATE TABLE IF NOT EXISTS messages (id INTEGER PRIMARY KEY, message TEXT)",
			);
		},
	}),

	// Tasks arrive on a durable queue
	queues: {
		prompt: queue<{ content: string }, { text: string }>(),
	},

	// Process one task at a time off the queue
	run: async (c) => {
		for await (const message of c.queue.iter({ completable: true })) {
			// Load the session history from SQLite
			const rows = await c.db.execute("SELECT message FROM messages ORDER BY id");
			const history = rows.map((row) => JSON.parse(row.message));

			// Run the agent loop until the task is complete
			const userMessage = { role: "user", content: message.body.content };
			const result = await generateText({
				model: anthropic("claude-sonnet-5"),
				messages: [...history, userMessage],
				tools: c.vars.tools,
				stopWhen: stepCountIs(20),
			});

			// Append the new user message and everything the agent produced
			for (const newMessage of [userMessage, ...result.response.messages]) {
				await c.db.execute(
					"INSERT INTO messages (message) VALUES (?)",
					JSON.stringify(newMessage),
				);
			}

			// Reply to the caller waiting on this task
			await message.complete({ text: result.text });
		}
	},
});
Step 6: Register the actor and start the server:
import { setup } from "rivetkit";
import { codingAgent } from "./actors";

export const registry = setup({ use: { codingAgent } });

registry.start();
The full runnable example is on GitHub.
Frameworks That Run the Harness Outside the Sandbox
This architecture is already well proven, despite being poorly communicated across the industry. There are a lot of options that run the harness outside of the sandbox for you:
- Rivet Actors (bring your own harness): Rivet Actors are the most flexible option for bringing your own harness with sandboxes, because it’s a generic primitive, and it’s open-source and self-hostable. See the documentation and GitHub.
- agentOS (existing harnesses): agentOS is built on top of Rivet Actors, and it provides support for this architecture with mainstream harnesses like Claude Code, Codex, OpenCode, and Pi. It also lets you provide your own custom agent, and supports talking to sandboxes using sandbox mounting. See the documentation and GitHub.
- Vercel’s Eve (custom harness): Eve provides the agent-outside-the-sandbox architecture with Vercel-native primitives.
- Cloudflare’s Flue (modified Pi): Flue provides the same architecture with Cloudflare-native primitives.
- Amp Orbs: Amp Orbs run agents with durable threads, self-scheduling, and agent-to-agent messaging, all automated from the Amp CLI.
- OpenAI’s Agents SDK (bring your own sandbox): Sandbox Agents keeps the agent loop in your own harness and delegates execution to a pluggable sandbox client, with hosted providers including Cloudflare, Daytona, E2B, Modal, and Vercel.
- Anthropic’s Managed Agents (hosted loop): Managed Agents keep the agent loop on Anthropic’s infrastructure while tool execution runs in a sandbox you configure (Cloudflare, Daytona, Modal, and Vercel at launch, or bring your own). It validates the same split, but the loop runs on Anthropic’s servers instead of your backend.
Frequently Asked Questions
- Is it insecure to run the harness outside the sandbox? No. The tools are effectively API calls into a sandbox. Nothing lets the agent run code or touch files on the machine running the harness.
- How do I run Claude Code, Codex, or OpenCode like this? They don’t support this architecture natively, but agentOS provides a runtime that enables these harnesses to operate this way. Pi supports it directly: you can swap out its coding tools for tools bound to your sandbox, like the Vercel AI SDK example above.
- Isn’t this more expensive than just the sandbox? No. An actor is a few megabytes of RAM, and a lot of the time it’s the only thing running instead of the full sandbox. For example, reading or sharing a thread doesn’t need to boot the full sandbox.
- What’s the latency of running the agent outside the sandbox vs inside? Negligible. Roughly 10 milliseconds extra per tool call in the same datacenter, compared to 50 to 200 milliseconds for a typical API request from your browser.
Get Started
Everything in this post runs on Rivet Actors, which is open-source and self-hostable. Come join our Discord, drop a reply, or shoot me a DM if you have questions. Happy to chat.
- Documentation: rivet.dev/docs/actors
- GitHub: github.com/rivet-dev/rivet
- Discord: rivet.dev/discord